Showing posts with label claritystamp. Show all posts

Monday, 2 May 2016

May's Claritystamp Samples

Hello. I hope you're enjoying the bank holiday. We had a great time yesterday watching the amazing Tour de Yorkshire riders whizz past and Barbara's shows on Hochanda later. Such beautiful samples from the rest of the DT and the light panel is a great One Day Wonder. As Barbara mentioned, the DT were lucky enough to get one and it is a really handy gadget. It's so much easier than holding things up to the window like I've done in the past.

There was a bit of a retro feel to the show yesterday with some old favourites.  Although I'm a dog person I do love the cat stamps.


These are the cards I made for the show.  As always, I will be back to blog them individually throughout the month.

Lynne
x

Thursday, 28 April 2016

My Mum's 70th Birthday Card

Hello. It was my mum's 70th birthday this month and this is the card I made for her.


I created the scene around last month's New Design Stencil Club stencil (the trees) and framed it with one of my favourite foliage stamps from the Birdhouse Garden set.


I then got a bit experimental - I have a heart stencil, that I cut with my Cameo, and I brushed Distress Ink through it over the top of it all. I went heavier in some areas than others so it wasn't too uniform.  Luckily I really liked the result. 

Love you lots Mum. x

Stamps and Stencils Used
NDC 22 Stencil

I hope you have a great bank holiday weekend. Don't forget that Barbara is on Hochanda on Sunday (1st May) at 2pm and 5pm. There's also a One Day Wonder launching at 8pm, so that means 4 more hours on Monday too.

Lynne
x


Monday, 25 April 2016

Filigraphy Hot Air Balloons and Flower

Hello. I wanted to get this post written yesterday but I had such a busy weekend and I didn't get the chance. Better late than never though.


This is the card I made for Paul's show on Saturday. I didn't really know anything about Monument Valley so I had a look at some pictures to see what it looks like. The sky seemed to be a lovely bright blue in most of the photos so I dug out my brayer and went for it.


First I stamped and masked the balloon, then I added the Monument Vally mask and brushed it in using Walnut Stain, Vintage Photo and Rusty Hinge Distress Ink.

When that was done I swapped the mask over and brayered in the sky. I used Stonewashed Adirondack and Salty Ocean Distress Ink for this.

I must admit I love the Filigraphy stamps in simple black and white but this one needed colour so I added some with my Spectrum Noir pencils.

I finished it off with some of the Line Sentiments.

I thought I'd add a few of my previous Filigraphy samples too as a couple were shown on Saturday and I know there are always new people who won't have seen them before.


Life is a Journey - blogged here.


Filigraphy Hot Air Balloons - blogged here.


Filigraphy Flower - blogged here.

I'd better get up to my craft room as I am a bit behind on my sample making. I know what I want to do for today's card, I'm just not sure how to achieve it. It could be a frustrating day.........

I hope you have a good week.

Stamps and Masks Used

Lynne
x

Friday, 22 April 2016

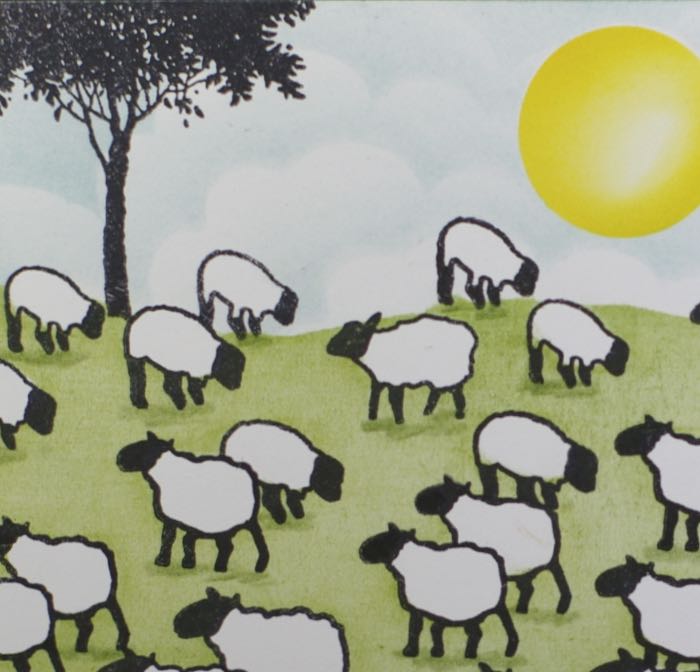
Ewe Are How Old? - 50th Birthday Card

Hello. I couldn't resist doing a cheeky card for my friend's 50th birthday.


Instead of 50 candles on a cake, I have 50 sheep on a hill.

It was inspired by one of Barbara Gray's demos on the last Hochanda show, although Barbara used nice phrases like "Ewe are special", "Ewe are my sunshine" and "I love ewe".


I had no clue how much room 50 sheep were going to take up, so I started on the bottom of the card and worked my way up. I numbered the masks as I did them so that I didn't lose count. 

When they were all safely covered, I placed the torn paper so that a couple of them were above it and brushed in the hill.


I then used a Spectrum Noir pencil to add a bit of colour under their feet.


I used a mixture of Clarity stamps and a stencil to do the inside. She's a fellow Labrador owner so I had to get one of those in somewhere.

It's funny, whenever I buy cards I tend to go for humorous ones but as a stamper it's not something I make that often. I so enjoyed doing this one!

Stamps and Stencil Used
Labrador - Thank You Framer

Don't forget that Paul Church is on Hochanda tomorrow (Sat 23rd April) with three shows - 11am, 2pm and 6pm.

Lynne
x

Tuesday, 19 April 2016

Wee Spring Scenes

Hello. This is the last of my samples from Barbara's show..............

Clarity sample
...but it wasn't the first card I made like this. It was also my mother-in-law's birthday around the time I was making my samples and I was enjoying the new stamps so much .............

My mother-in-law's birthday card
............that I made her card with them too. I was really pleased with how it turned out so I thought I'd make a similar one for Clarity.


I did them both the same way - First I brushed in the daffodil frame using Butterscotch Adirondack ink and Spiced Marmalade Distress Ink. I then masked it off to work on the central panel. The images were stamped in place and masked off so that I could brush in the background. 

I do love the Picture Framer stencil. It's perfect for this time of year and works equally well in portrait or landscape.

I'll be back soon with some personal cards I've made recently. Funnily enough they all feature this month's stamps too. I do love them!

Stamps and Stencil Used
Wee Lynne
x

Saturday, 16 April 2016

Crazy About You

Hello. I'll keep today's post short and sweet after a rather long one last time.


This is the second of my samples focussing on the Word Chain Letters. After doing my driving test card I was lacking in ideas, so I thought I'd look through my stencils and see if it sparked anything. It did! When I saw the Cracked Box Frame stencil I thought "crazy paving", which led to "Crazy about you". 


I tested it out on a piece of card and luckily it was the perfect size for the aperture.

I ran the card and stencil through my Ebosser to emboss the frame and then sponged Sail Boat Blue and Eggplant Alcohol Ink though the stencil. To make it more defined I finished it off by brushing Faded Jeans Distress Ink over the top.

Simples!

Stamps and Stencil Used

Lynne
x

Wednesday, 13 April 2016

Farmyard Scene

Hello. Are you sitting comfortably? I have a feeling this could be a long post.

I could have been naughty and cloned out my wee accident with this one, but I couldn't do that to the real thing so here it is warts , or should I say coffee drops, and all.


I've done similar projects with the House stencil before (my favourites can been see here and here) but I couldn't resist doing another with the Wee Farm set. It's perfect for them.


I started off by placing the stencil on some paper to work out where I wanted everything and make sure the perspective was okay.


When I was happy with that I inked in the house and trees. I put the inner part of the stencil on that card and sponged on Jet Black Stazon. I kept the ink pad nice and wet by regularly applying the reinker, both to the pad and the Cut-N-Dry foam.

I then started the stamping with the fence but I messed it up and had to start all over again!


Eventually I got everything stamped neatly and I masked off the areas that I didn't want green. The hills were then brushed in. 

You can see I haven't masked off the fence. I was initially concerned about this..........


...........but when I was out with Maya I noticed that the wooden fences were all green anyway. What luck!


It was all going quite well, but then my luck changed. Hubby had brought me up a cup of coffee and I was walking across my craft room with it when I slipped on some plastic. Coffee and I went flying...........


...............and my lovely scene ended up looking like this! Thankfully it was only a dinky cup of espresso but it still made a mess. Because it's on smooth stamping card it blistered a bit too where the liquid hit it. As you can imagine, I was gutted! I'd spent ages planning and making it and I couldn't exactly stick a butterfly over them all (they were more obvious in real life than in my photo).


I couldn't bear to bin it, so I did what I could to rescue it - another horse and a tree behind the barn covered up two spots and a bit of black pen covered the one at the top. The only one I couldn't disguise was the one under my Wee Cow (and trying to do so made it worse), so I like to think that my Wee Cow has just had a wee. It's the country!

I actually liked the busier look of it , so I added a few more trees too, as you can see on the finished piece at the top.

It's not perfect but I really enjoyed making it, well most of it.

Stamps and Stencil Used

Thanks for visiting. 

Lynne
x


Sunday, 10 April 2016

Forest Scene Gelli Print Card

Hello. I hope you're enjoying your weekend. Hubby's diving, so I've been busy sewing. It was going well until a minute ago, so I thought I'd take a break and show you another of my samples.

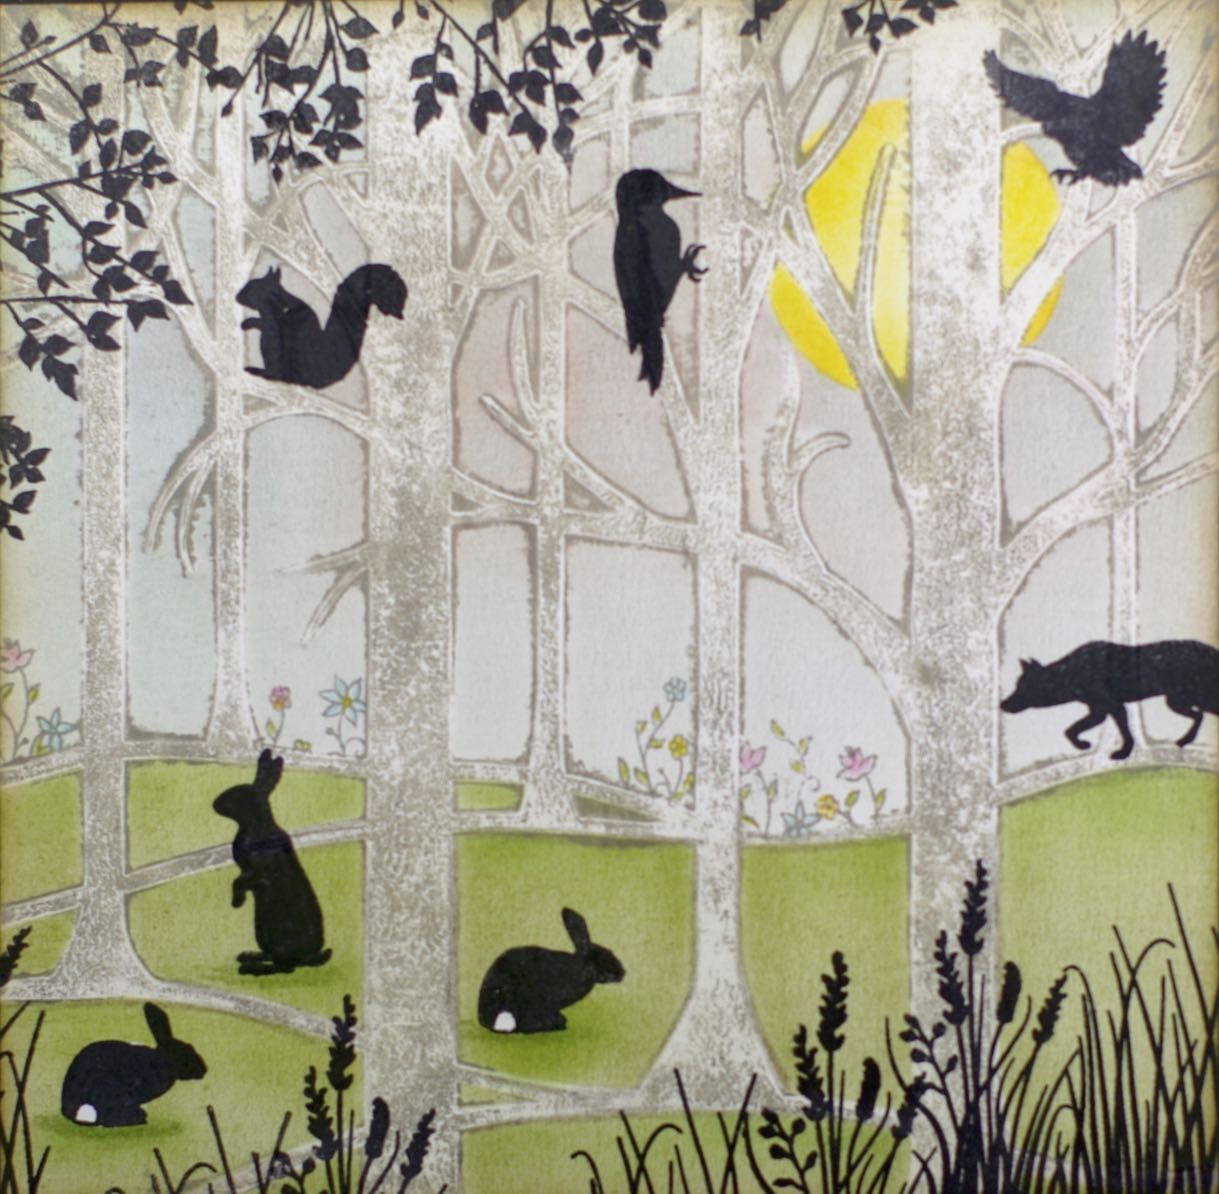
When I saw the Wee Country Animals stamps I wanted to make a scene using as many them as possible. That meant finding a tree for the woodpecker to cling to.


The Treescape stencil is perfect for what I had in mind. 


I used Warm Grey acrylic paint by System 3 on my Gelli Plate to take the print of the trees. Then I stamped the sitting bunnies and masked off their tails, so that I could brush in the background using Distress and Adirondack ink pads. Finally I added the rest of the animals and foliage black using Jet Black Archival ink.

Stamps and Stencils Used

I've finished my coffee and this post so I'd better go and get my unpicker out. 

Lynne
x

Thursday, 7 April 2016

Congratulations On Passing Your Driving Test Card

Hello. I really enjoyed making this month's cards and the Alphabet Word Chain stamps are one of the reasons for that. Deciding which letters you're going to use and combining them together is such fun. I made a couple of cards focusing on them and this is the first.


The front of the card is simply a torn up L plate...........


.............and when you open it up, it reveals the text.

My first idea was to cut it out on my Cameo but I then decided that layered up card might not rip that well. Instead I printed it out on card instead, using the Cameo's Silhouette Studio to draw it. 


I then ripped it in half, as if I'd just passed my test, and stuck it to the front of a gatefold card.


"Congratulations" and "Your" are Word Chain words which I combined with words I created using the alphabet.  I stamped them out on copy paper first. This gave me the chance to work out the combination of upper and lower case letters I wanted to use and see if I wanted to change anything (you can see I did). 


I cut them out, so that I could check how to position them, and then stamped them onto the card. 


A couple more ripped up L plates add a bit of colour inside.

Do you remember passing your test? 


It got me thinking about mine and I just found this photo of me after I passed, first time, nearly 30 years ago. Such a great day. I wonder if my Fiesta is still on the road? Probably not. I did love that car...........happy times.

Stamps Used
Congratulations from Word Chain 11
Your from Word Chain 3

Lynne
x

Monday, 4 April 2016

April's Claritystamp Samples

Hello. Just a quick post before I start cooking - Hubby will be home in an hour. I had so many things planned for today but I got a bit distracted by the Claritystamp shows and then one of Barbara's demos sparked an idea for a friend's birthday card and then it was now!  So I guess it's been a productive day, just not in the way I had planned.

Aren't this month's stamps fab? They are right up my street and I had such fun playing with them. I had lots of distractions when I was making them too as they were mainly done over the Easter weekend and Hubby was off work. He did keep me supplied with coffee though, although that itself caused a major problem. I'll tell you more about that when I blog the cards..............


Here's a photo of them all together. as always I'll blog them all individually throughout the month. I also have a few personal cards to share.

See you again soon.

Lynne
x

Thursday, 24 March 2016

My Dad's 70th Birthday Card

Greetings! I've been in sewing mode for the last couple of weeks but some new Clarity stamps have just arrived so I'm back in card making mode and thought I should say hello. I've not made any cards for a while but I do have one left to blog.


It was my dad's 70th birthday last month and this is the card I made for him. It may look familiar to NDC members as it's based on one of Barbara's January projects. When I saw it I thought it would work well for my dad as he is a keen birdwatcher. 

As I added the branch stamp I changed the sky to clouds and a sun so that I didn't have to mask it off. 

I'd better go and get started on my samples. If I can get Hubby to take some photos I'll blog my sewing until I have more cards to share - I've made 5 tops in the last few weeks. Let's hope my card making goes as smoothly......

Stamps Used

Lynne
x

Sunday, 6 March 2016

A Groovi Mother's Day

Good morning. I probably couldn't have picked a worse day to blog my first Groovi cards, as all the DT will be sharing their masterpieces from today's shows on Hochanda, but they are appropriate for today so here goes.....

I did have a try at the Catterick Open Day but I didn't get my own until this week when Hubby bought me some bits for my birthday.  Thank you. x

I picked these plates as I thought they would make pretty Mother's Day cards and looked quite simple. The problem was I had to get them in the post the day after they arrived! That didn't give me any time to practise so these are my first two attempts.


This is the one I started with. I've also joined the Groovi Club, so I began by tracing out the ovals from the Mini Plate Mate for the text to see how it would fit. Luckily it was the perfect size for the centre of the floral wreath so I just took it from there. One of my favourite things to do in stamping is building up a picture with masking so I love how the Groovi system makes this so simple.

When I'd traced all of the design I coloured it in with my Spectrum Noir pencils. I decided to avoid the white work as I didn't have much time and I was worried about messing it up. 


I was feeling a bit more adventurous when I got to this one and decided to have a go at the white work. The only problem was I didn't have a clue where to do it. When you're not colouring it in is the white work the light or shade? Does it matter? I do know I need to do it for longer as mine isn't hugely white but at least I didn't go through the parchment!

I thought the hard bit was over when I'd finished that but then I had to make them into cards - I hadn't thought about that part. White work does not show up well on white card and different coloured card changes the look of what you've coloured. What to choose? In the end I used some of the Clarity blue pearl paper for both. Next time I will think about this before I start.

So many things I have to learn. If you have any tips for me I'd love to hear them. The main thing I've learnt so far is that Groovi cards are a lot of fun but can't be rushed.

I'll be glued to all of the shows on Hochanda today and Monday. I'm sure I'll pick up lots of hints and I know I'll be inspired by Barbara and the DT's samples.

Happy Mother's Day Mum. I hope you like your card.

Groovi Plates Used
Butterfly Wreath and Meadow Grasses


Lynne
x

Friday, 4 March 2016

A Gelli Blast From The Past

Hello. Thanks for the comments on the last post - they did make me smile. Purple jumper has been popped in a charity bin. Its fate is now out of my hands. :)

Today's card also has me reminiscing.


Do you recognise it?


When I was looking through my Gelli prints for the last card I blogged, I also found this one. It's from an "In The Classroom With Barbara Gray" show on 3rd August 2013. I thought it should be made into a card so I added a bit to it, trimmed it down (as the middle was a little bit wonky) and did just that. 

I have missed those shows but Hochanda are planning on doing their own version; so that's something to look forward to.


 I used to move my stuff downstairs so that I could craft along with Barbara. 


These are my other pieces from this lesson.


The Birdhouse Set is still one of my favourites and I've used it so much.


Hopefully I'm getting better! Have you still got yours?

Stamps Used

Lynne
x

Sunday, 28 February 2016

You Are A Brilliant Work Of Art

Good morning. I hope it's nice where you are - it's a beautiful sunny start to the day here. I'm off to walk Maya when I've written this, then I have a top I made yesterday to hem.

When the "Brilliant Work of Art" stamps arrived I thought they'd look good on a Gelli print so I looked through my stash and found this one.


I made it in 2013 during an experimental session when I was making samples for the stencils.


As you can see, some were way more successful than others! I always liked this one though, so I kept it and have been waiting for the right time to use it.


This is what I used to make the Gelli print.

To make it into a card  I stamped in Versamark and heat embossed with white powder. 


I then went around the embossing with a black pen........


...........and added the paint brush to finish it off.

Stamps and Stencils Used


Maya! Walkies!

Lynne
x

Thursday, 25 February 2016

You Complete Me

Hello. I hope you're having a good week. Mine's been very productive. Yesterday I pulled out the shoes and sandals that I had stored in boxes in the bottom of one of my wardrobes. I tried them all on and put them in three rows - one to keep, one to take to the charity shop and one undecided/ask Hubby for a second opinion. On counting them I was shocked to discover that there were 35 pairs! When he came in from work and went upstairs I heard "Where the **** did all these shoes come from?".  He quickly decided that all of my undecided ones should go, so I now I have 10 pairs on the keep pile. Oops! I do have a lot more room in my wardrobe though. Next job is the clothes hanging in it and I will be just as ruthless.

I've had a day off from that today and have had a lovely time watching Barbara's shows on Hochanda. I especially enjoyed the last hour as it was fab to see Barbara on with Leonie again.

Here's the first of the two cards I made for today's shows. I do love a bit of cheese and sometimes it creeps into my card making.


Sorry but I just couldn't help myself!  :) 

I started off by stamping the text in the boxes............


......then I brushed on some Distress Ink to take away the whiteness. I liked how this was defining the pieces so I finished off the edges with Walnut Stain .


I masked off the letterboxes then added the hearts using a stencil and Fired Brick Distress Ink.


It still needed something so I added a bit of sparkle to some of the hearts.


I hadn't left myself much room to stamp the sentiment so I had to type the word "complete" on my computer and print it out. I then used the Letterbox set to stamp the rest of it above and below.

I added a few Walnut Stain stencilled hearts and I separated the "YOU" and stuck it on with Pinflair gel to finish it off.

Products Used
Hearts stencil from the Basic Backgrounds Set

Thanks for visiting. I'll be back soon with my second card from today.

Lynne
x

Related Posts Plugin for WordPress, Blogger...