Showing posts with label Gelli Print. Show all posts

Sunday, 10 April 2016

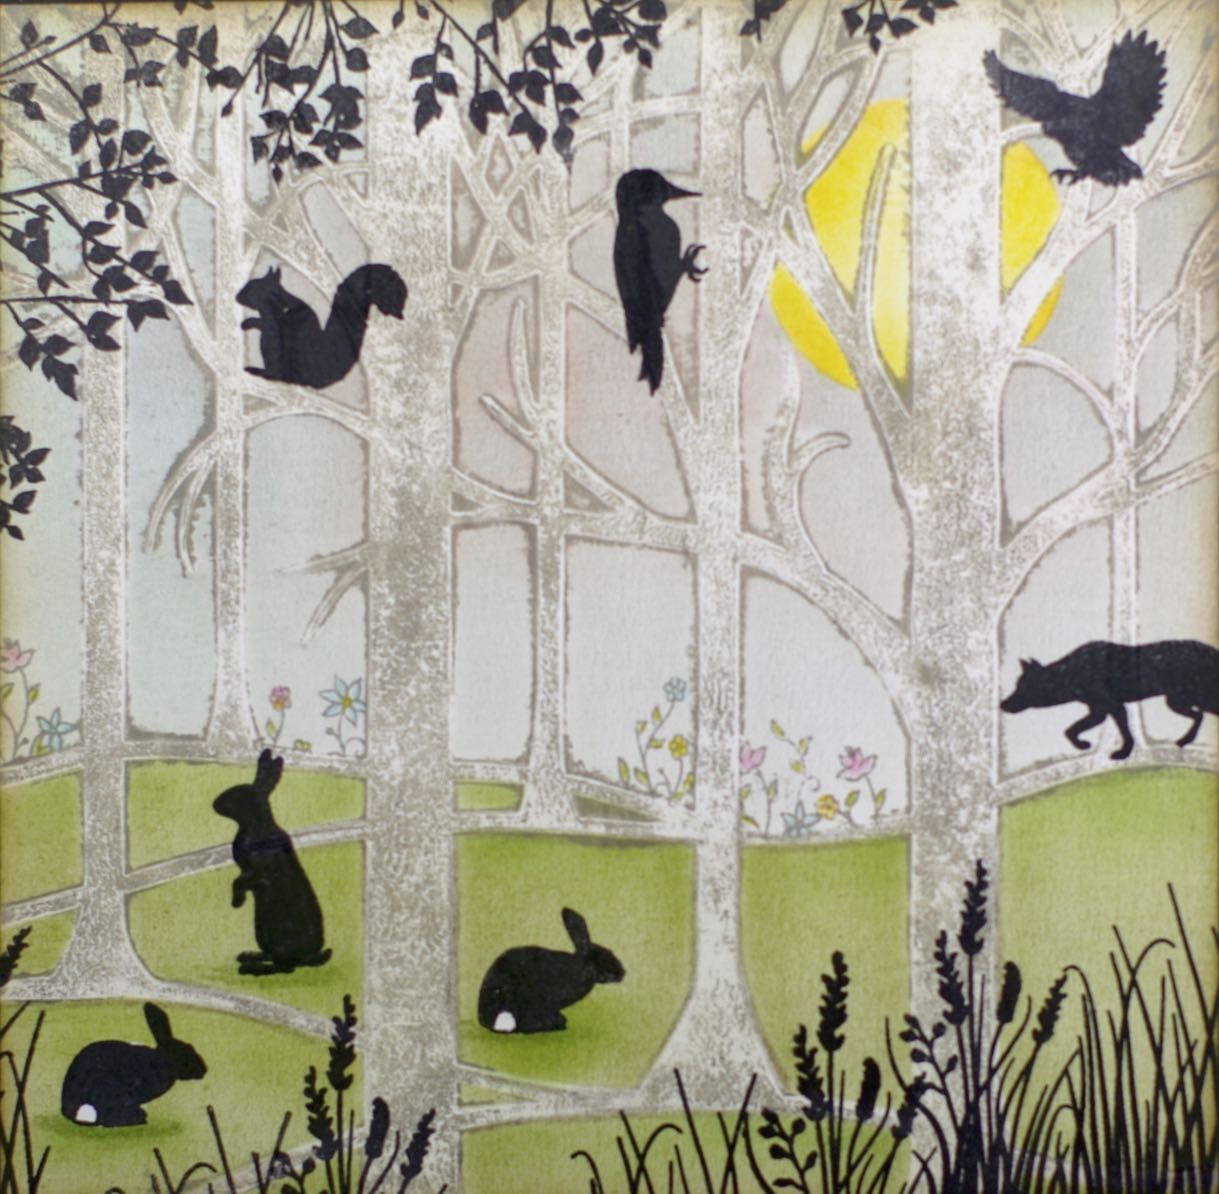
Forest Scene Gelli Print Card

Hello. I hope you're enjoying your weekend. Hubby's diving, so I've been busy sewing. It was going well until a minute ago, so I thought I'd take a break and show you another of my samples.

When I saw the Wee Country Animals stamps I wanted to make a scene using as many them as possible. That meant finding a tree for the woodpecker to cling to.


The Treescape stencil is perfect for what I had in mind. 


I used Warm Grey acrylic paint by System 3 on my Gelli Plate to take the print of the trees. Then I stamped the sitting bunnies and masked off their tails, so that I could brush in the background using Distress and Adirondack ink pads. Finally I added the rest of the animals and foliage black using Jet Black Archival ink.

Stamps and Stencils Used

I've finished my coffee and this post so I'd better go and get my unpicker out. 

Lynne
x

Friday, 4 March 2016

A Gelli Blast From The Past

Hello. Thanks for the comments on the last post - they did make me smile. Purple jumper has been popped in a charity bin. Its fate is now out of my hands. :)

Today's card also has me reminiscing.


Do you recognise it?


When I was looking through my Gelli prints for the last card I blogged, I also found this one. It's from an "In The Classroom With Barbara Gray" show on 3rd August 2013. I thought it should be made into a card so I added a bit to it, trimmed it down (as the middle was a little bit wonky) and did just that. 

I have missed those shows but Hochanda are planning on doing their own version; so that's something to look forward to.


 I used to move my stuff downstairs so that I could craft along with Barbara. 


These are my other pieces from this lesson.


The Birdhouse Set is still one of my favourites and I've used it so much.


Hopefully I'm getting better! Have you still got yours?

Stamps Used

Lynne
x

Sunday, 28 February 2016

You Are A Brilliant Work Of Art

Good morning. I hope it's nice where you are - it's a beautiful sunny start to the day here. I'm off to walk Maya when I've written this, then I have a top I made yesterday to hem.

When the "Brilliant Work of Art" stamps arrived I thought they'd look good on a Gelli print so I looked through my stash and found this one.


I made it in 2013 during an experimental session when I was making samples for the stencils.


As you can see, some were way more successful than others! I always liked this one though, so I kept it and have been waiting for the right time to use it.


This is what I used to make the Gelli print.

To make it into a card  I stamped in Versamark and heat embossed with white powder. 


I then went around the embossing with a black pen........


...........and added the paint brush to finish it off.

Stamps and Stencils Used


Maya! Walkies!

Lynne
x

Sunday, 21 June 2015

My Gelli Print Father's Day Cards

Hello. I know when I write my posts that I'll always get at least one person reading them - My dad. So I'd like to start by wishing him "Happy Father's Day".

As I mentioned in my previous post, he loves bird watching. Where as my father-in-law loves horses, so I thought I'd make a bird card and a horsey card (not very original but I never know what to make for men's cards). Other than that I was stumped. Then I saw this post on Barbara Gray's blog and was inspired.

I haven't played with my Gelli plate for a while so it was great to get it out again. I've used different colours, stamps and stencils to Barbara but I followed the steps she took.


This is my dad's with the new Geese stamp...........


.............and this is my father-in-law's with the Wooden Horse stamp.

I hope they (and you) like them.

Thanks for joining my dad and visiting my Crafty Little Blog today.

Stamps and Stencils Used


Lynne
x

Friday, 20 February 2015

Congratulations Card

Hello everyone. Today I'm blogging my last card from February's Claritystamp show on Create and Craft TV and when I've finished this I will be cracking on with next month's.


I started off with a piece of white card.............


............and created the background with the help of my Gelli plate.

I squidged the Antique Linen Distress Ink onto the Gelli plate and spread it out using a brayer. I then used Barbara Gray's technique of scrunching up a ball of copy paper to create a pattern in the ink before taking the print.


I marked the half way point along each edge, so that I could see where the stencil needed to go, and applied Walnut Stain and Frayed Burlap Distress Ink with a blending tool.


After repeating that in each corner I ended up with this.

I stamped the heart and congratulations in Versamark Ink and heat embossed it in detail gold powder.


I also gave it a gold edge. To do this I positioned about a cm of the card over the edge of my desk then wiped the Versamark pad along it at about a 45° angle. I then applied the detail gold powder and heat embossed it.


I went over some areas a couple of times to build up the colour.


I masked off the heart and sponged on some more Distress Ink to make it stand out more. Luckily I'd kept the mask I'd made the last time I used this stamp so that saved me one job!

To finish it off I made another print for the base card and added a few birds.

That was a long one! I'm glad I remembered to take the photos though as it makes it so much easier to explain...............well I hope it does!

I can't wait for my next post - I'm going to share my birthday present. It's something a bit different but I hope you'll like it. It certainly inspired my friend Connie as she bought lots of bits on our last coffee, cake and shopping morning to have a go herself.

Stamps Used

Lynne
x

Saturday, 15 November 2014

Sending You Sunshine

Hi there, I hope you're having a good weekend. I come with apologies and thanks - I've not been online much recently and after going on FB to catch up I come on here to find out that it's been 10 days since I last posted, so sorry about that.

I also spotted that my Crafty Little Blog has just passed 100,000 page views, so thank you for that. It's nice to know that I'm not talking to myself.

Thanks also for the interest on my Pinterest. After my marathon pinning sessions I now have all of the cards from my blog on there. So glad I won't have to do that again!


I've picked this card to come back with as the weather is so grey and miserable that I thought we could all do with some sunshine.

Last month when Mum and Dad were staying Mum and I watched this......


.....YouTube Tuesday video of Barbara Gray's and were inspired to have a go. I chose to use the Double Bubble stencil and we ended up with a fab print. I didn't know what to do with it though..........until the Umbrella Girls stencil arrived. I thought they would be fun together and a bit different, although I did feel bit naughty sending a sample to Barbara that used her own idea! lol

The original print was done with the 7 x 7 inch stencil but I wanted to use it for the background too, so I got out my 9 x 11 inch version and did another larger print with that.

I used the same colours as Barbara did - Mustard Seed, Broken China and Worn Lipstick Distress Ink. The stencilling of the Umbrella Girl is done with black Stazon ink on a sponge and the stamping is done with black Archival.

The small umbrellas are from the Remountable Clarity Characters set. They go so well with this month's umbrella stamps and stencils.

"Sending You Sunshine" finishes it off.

The next day - Oops, I've just noticed that the video doesn't seem to be there when I look at this post on my iPad (there's just a gap) but it is on my iMac (which I wrote it on). I must have done something wrong. Anyway if you can just see a space click on it and it should take to to the video. I hope!

Stamps and Stencils Used

Lynne
x

Monday, 15 September 2014

The Great Outdoors

Hi everyone. I hope you had a good weekend. I had a fab time yesterday at the Claritystamp Open Day in Colburn (near Catterick Garrison). It was lovely to catch up with old friends and meet new ones. Barbara, Dee, Maria, Paul, Mandy, Jo and Sam did a fab job on the demos. I came way really inspired and have already had a play with shaving foam and Alcohol Inks this morning (thanks for the tips Dee). I bought some new goodies including the supplies needed for the hand-painted vase project in this month's New Design Stamp Club project sheet. Maria was demonstrating that technique and her samples were gorgeous. A couple of crafty friends there (you know who you are!) treated themselves to the full set of re-inkers but I was good and just bought a few to try................although if I like them I'm sure I will be adding to my collection. After all I do have all of the ink pads and I'm sure will need re-inking one day.

The venue was perfect and we were looked after so well by the Clarity team (as well as the demonstrators there was Dave, Heather, Len, Elaine and Chloe (apologies if I've forgotten anyone)) and the people from the church (loved the lunch). That reminds me of one thing I am trying to forget - Jim and his video camera. I could barely say what my name was, let alone anything sensible! Basically, everyone worked so hard to make it a success and it certainly was. Barbara said she will be doing it all again next year so I will look forward to that.

Before I go, here's my last card from this month's Claritystamp show.


I do love the great outdoors, so I particularly love the words from this set and I can see myself using them a lot.

I started off my Gelli print with a layer of Buff Titanium acrylic paint. Then I masked off the area where I wanted the Mountain Range stamp to be and did the Treescape print on top.

The Mountain Range is stamped in Archival black and some colour has been added with Spectrum Noir pencils.

The Great Outdoors and Woodland Animals were stamped and clear embossed to make them stand out more.

I'll be back soon with my samples from the last German show.

Stamps and Stencil Used

Lynne
x

Sunday, 1 June 2014

Masculine

It's time for a new challenge on the Claritystamp Challenge Blog. Congratulations to the winner and Top 5 of last month"s "It's All In The Words" challenge. I do love the beautiful verse stamps that Clarity do and that challenge was the perfect way to use them. It was also lovely to see the new Word Chain words used and people creating their own with the Letterbox set and the new Wheelie stencils.


This is my card for this month's "Masculine " challenge. Appropriately for this month, it's a Father's Day card. It was conceived on our DT trip to France. Jo Rice very kindly gave me, Janet, Linda and Sylvia a lesson with inks on the Gelli plate. It was such a fun evening and we all bounced ideas off each other. Special thanks to them all.

The background was the fun part. We brayered Adirondack ink (in this case Denim) onto the Gelli plate and then messed about with water. 


This was the first one that we tried in France. I used a spray for it and applied way too much water. We could see that the idea had potential though and played some more. 


These two were my favourites. They were created by dipping my fingers into water and flicking them at the inked-up Gelli Plate. The one on the left is the first print, which I think looks like rain, and the one on the right is the second print, which I think looks like snow. Two for the price of one!

You may have seen on Barbara's blog that we all made little pieces of art for the DT members who couldn't go (and another for a giveaway)........


....well this is one of the ones that I made and what inspired today's card. I don't know who received it but I hope they like it. 

To make it I stamped the Jazz Man onto the card first and then masked him off before I took the Gelli print so that his white bits would remain white.


The Jazz Man actually has a cane in in his hand but I realised that the brolly from the Clarity Characters set fits him pretty well.


I just masked off the bits that I didn't want before I inked up the stamp. Volia! Jazz Man with Brolly.


I thought a larger version would make a lovely Father's Day card for my father-in-law so I made today's card when I got back to the UK. I wrote "Happy Father's Day" and "Singing in the rain" around the frame and there's Glossy Accents on the glass part of the lamps. 

I hope my FIL will like it. I certainly had fun making it. 

Thanks for stopping by. I look forward to seeing you all get "Masculine".

Stamps Used
Magical from Word Chain 7

Lynne
x

Monday, 19 May 2014

Oh I Do Like To Be Beside The Seaside

Finally, here's the first of my cards from this month's Claritystamp show. As I was talking a lot about beautiful houses yesterday...........


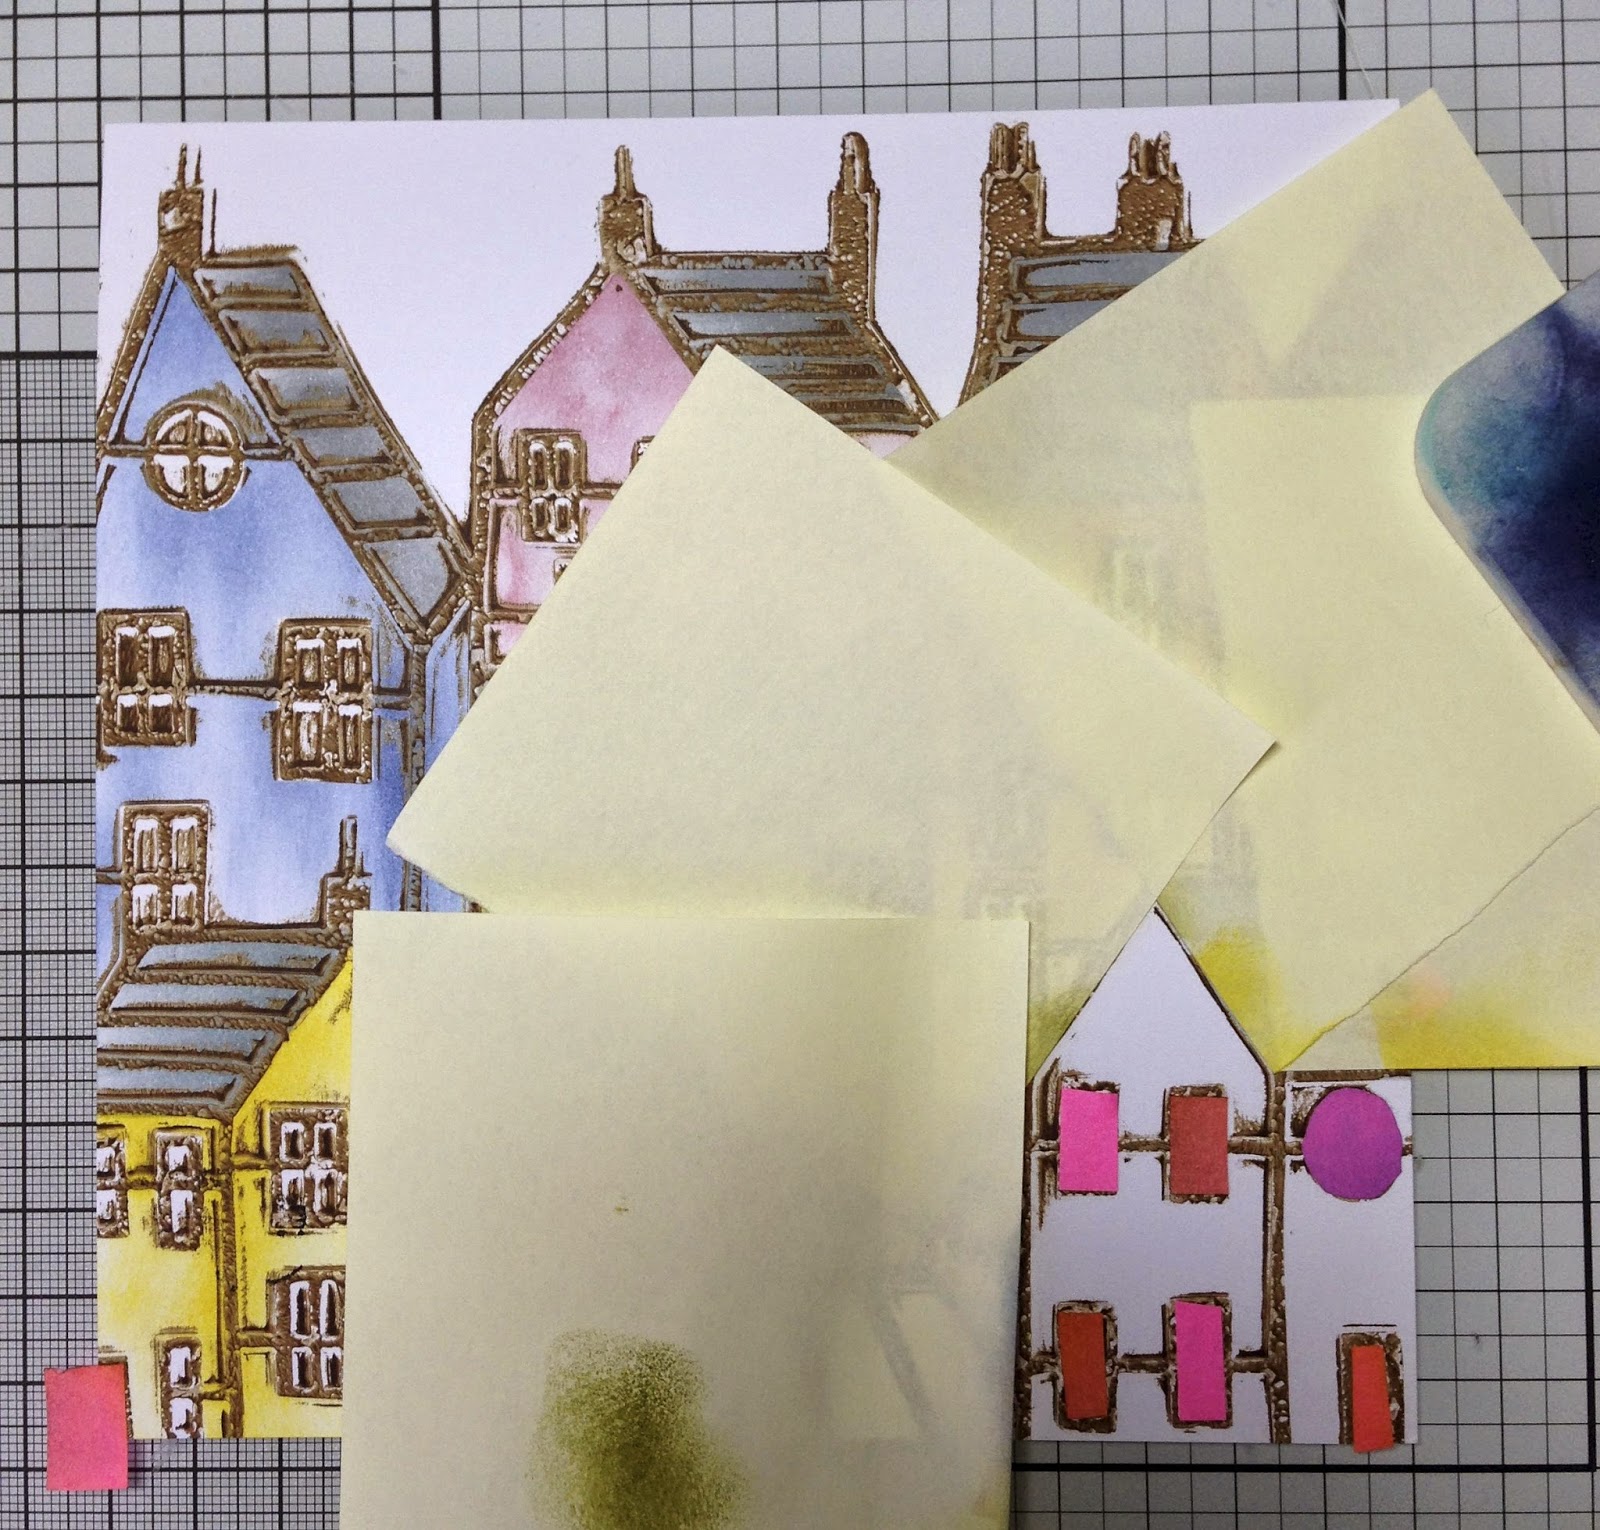
.........I thought this one would be a good one to start with. It was inspired by the colourful seaside houses you get in places like Tenby.

I used brown acrylic paint and my Gelli Plate to get the outline of the houses. Then I coloured them in with Distress Inks and a make-up sponge. This involved quite a bit of masking.


I masked off the windows and didn't add any colour to them as I liked them as they were.  I then made a frame around the houses with Post-its to protect the surrounding area and added the colour with a make-up sponge.

When I'd finished that I masked off the top four houses to add the sea and sky.

A flock of seagulls and a pink mat that matches one of the houses finish it off. 

I was quite reluctant to send this one in as I thought it would look lovely in a frame. When I have time I might have to make myself another.

Stamps and Stencils Used

Lynne
x

Saturday, 3 May 2014

Seeds of Change

I thought that I'd better get my final card from last month blogged before this month's show tomorrow. Where does time go?


This one is done on my Gelli Plate. I started off with a base layer of Buff Titanium before taking a print with the Pods stencil.I used Vale of Chromium Green for this.

When the paint was dry I put the stencil back in place and added some colour to the pods with a make-up sponge and Olive and Black Archival Ink.

To finish it off I chose the word "Change" from Word Chain 7. I thought this was appropriate for seed pods. It's stamped in black Archival and embossed with clear powder.

That was short and sweet but before I go I'd also like to share this sneak peek from tomorrow's show.


Don't forget - Barbara Gray is on Create and Craft TV at 9am for a two hour show. I can't wait to see it.

Stamp and Stencil Used

Lynne

Sunday, 27 April 2014

A Wheelie Joyful Scene

I hope you're having a wheelie good weekend. After walking Maya I sat down to do a few things online - that was well over an hour ago! Once I've written this I really must get back up to my craft room.


This is another card that uses one of my favourite techniques with the Gelli Plate - A base layer of Buff Titanium paint that has had scrumpled up paper pressed into it to give it some texture, followed by the print of the stencil. The colour is then added with a sponge. I love the distressed look this gives.

The stamping is done in Archival Ink and coloured in with Distress Markers.

When it was finished I stamped "Joy" onto it and cut it out with a Spellbinders die. I matted this onto some black card and stuck it on with Pinflair glue gel to give it some dimension.

Stamps and Stencils Used
Birds from The Birdhouse Set - Lesson 18
Joy from Word Chain 6

Lynne
x

Sunday, 20 April 2014

A Happy Accident

The title could be about a lot of my cards...............


...............but today it's about this one. For once I took photos as I went along so let me explain  what happened.

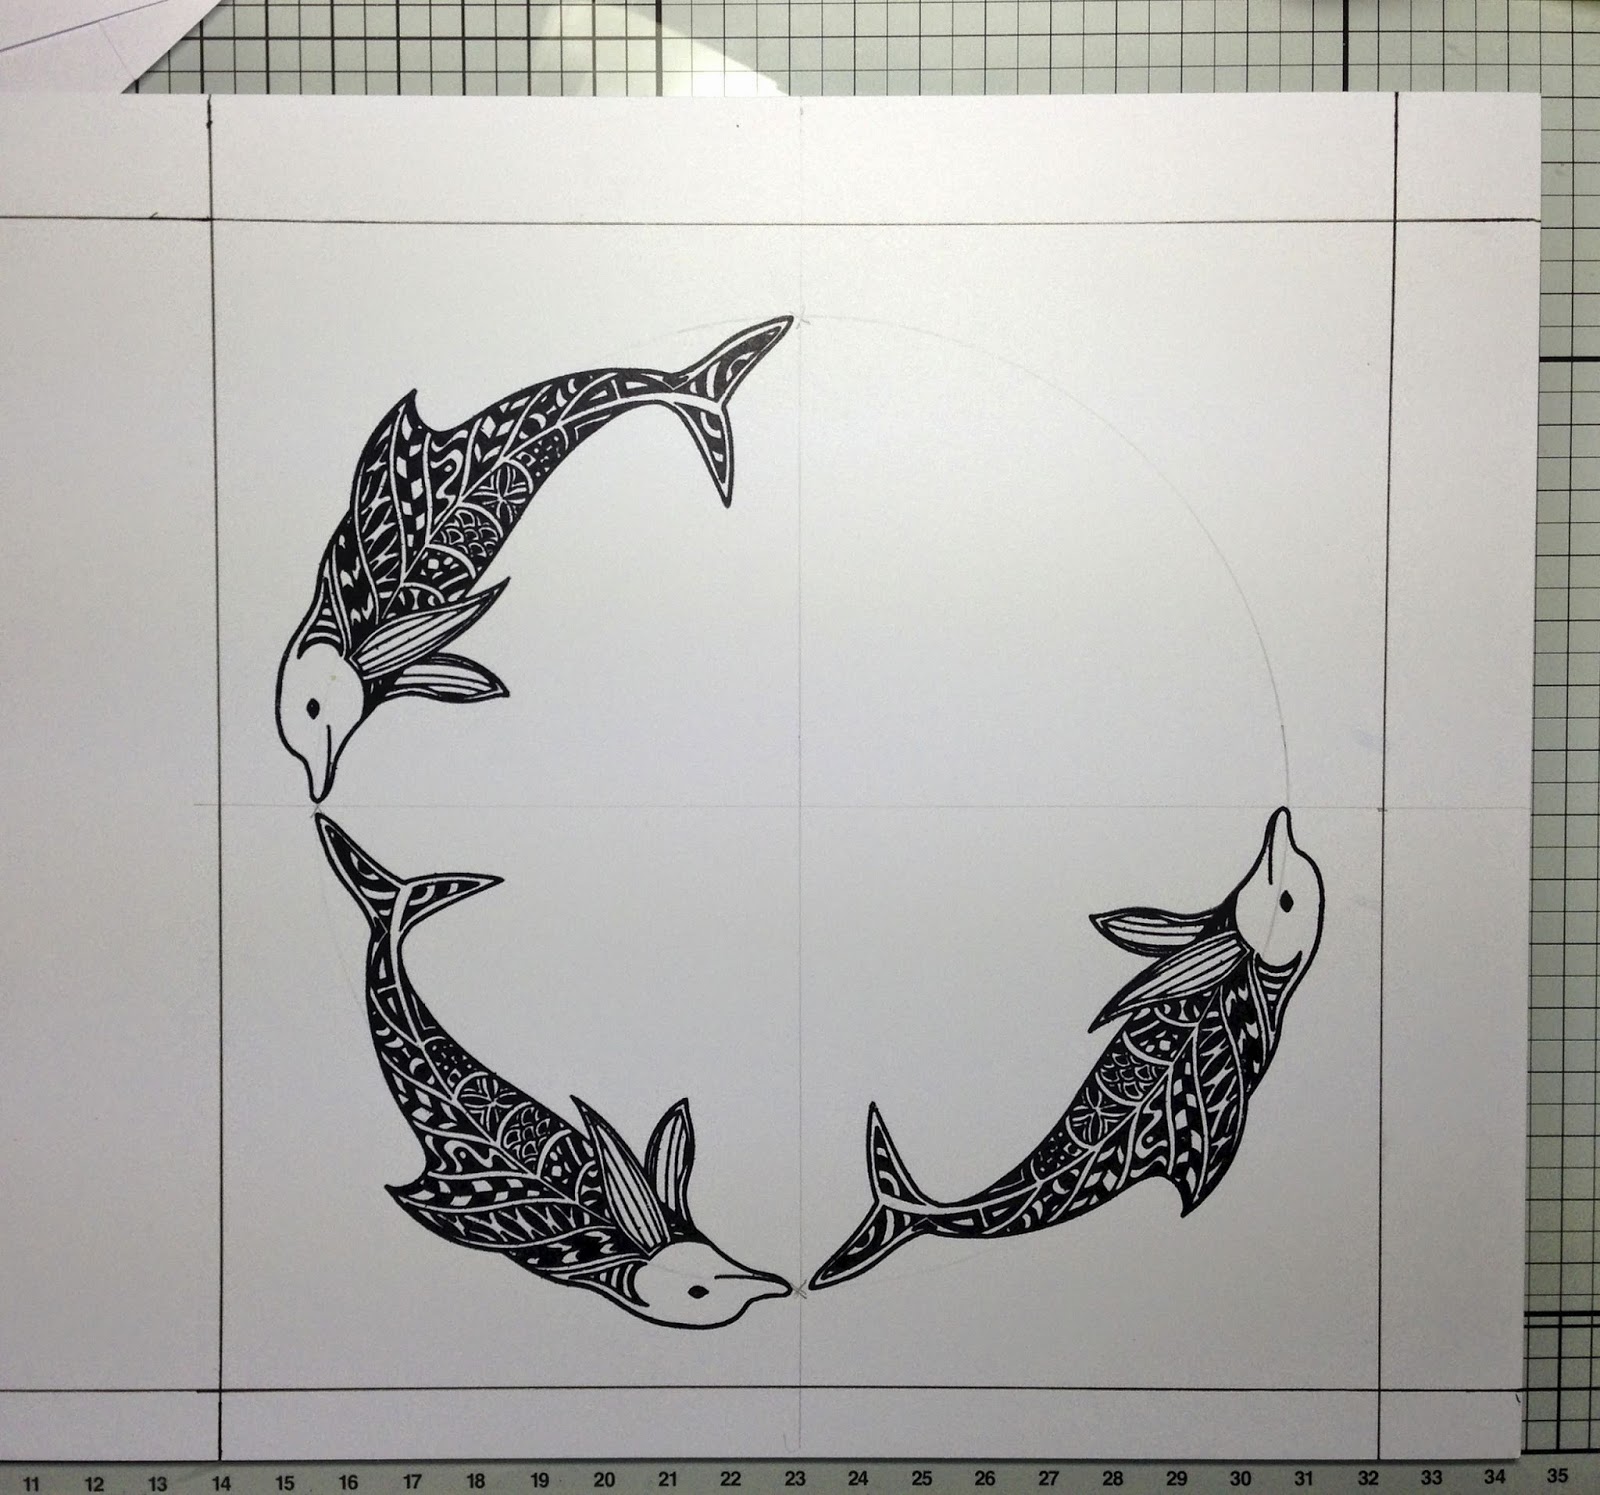
To start with I used my stamping in a circle technique (the post about that is here) to work out that I needed a circle with a 152mm diameter to position the four dolphins.


Using a compass I drew that on my card and quartered the circle so that I knew where to stamp each dolphin. I drew the outside square in pen so that I could see where to trim it when I'd done the Gelli print.

I then masked them off so that when I took the Gelli print the dolphins would remain untouched.

The Gelli print is the "Happy accident". I wanted a nice watery look for the background and I chose three colours for this - Phthalo Turquiose, Pistachio and Buff Titanium, letting each layer dry before I added the next.


Phthalo Turquoise went on first. I blotted a lot of it off to end up with a mottled effect.


Then I added a layer of Pistachio and used the Ocean Swirl stencil to create my waves. It was at this point that I realised that my beautiful waves would be covered up by the first layer. I should have done them the other way around!


Still, I carried on, adding a layer of Buff Titanium before taking the print. It may not have been the pretty waves that I was after but it is swirly and I rather liked it.

To finish it off the words were stamped in black Archival and heat embossed with clear powder. The edge was inked with Peacock Feathers Distress Ink. I then sponged on some grey ink to the dolphin's heads and some grey and black mats.

Stamps and Stencils Used

Lynne
x

Wednesday, 9 April 2014

Through The Arched Window - Boy and Girl Versions

As I mentioned on my quick peek at this month's samples, I LOVE the new boy and girl stamps, so I thought I'd start with these cards.


This version, with the boy flying away, was the one I made as a Claritystamp sample. The Boy and Birds stamp fits perfectly in the Clarity Sun Arch stencil and I thought it would make a lovely scene.

I started off by creating the Gelli print using the Brick Wall stencil. I cut out a paper mask using the Sun Arch stencil and placed this on the Gelli plate before I took the print. This gave me a nice clean area to do the stamping on.


I kept the scene simple as I wanted the main focus to be on the boy. He is stamped in black Archival. The stamping on the wall was done in that too, only that was also embossed with clear powder.

I was so pleased with how it turned out that I decided to do another version for my friend Lucy's birthday yesterday. One of the things that brought us together in the first place was our love of our Yellow Labs, so I often make her a card with a Labrador on it.


The previous card inspired me to make this version. I thought that the little girl with the word love in her balloons was perfect to go with the Labrador. We are both a bit bigger but we do love our Labs!

To alter it a bit more I also used some different trees. Which version do you like best? I think you can probably guess which is my fave. 

Stamps Used
Labrador from the Remountable Home Set

Lynne
x


Thursday, 13 February 2014

Magpie Gelli Print

I've been a busy girl today. I took another set of Claritystamp samples to the Post Office, then I came back and made my Dad's birthday card. I rushed out to get it in the post only to find I'd missed today's collection. Never mind, it should still get there in time........

I thought I'd have a break and write this before I disappear upstairs to make Hubby's Valentine card. This month's Clarity NDC stamp has arrived at the perfect time.


Sometimes when I use my Gelli plate I'll take lots of prints before I achieve the look I'm after. This one was my first attempt. I loved the mixture of colour and pattern so stopped there.

It was built up in three layers. The first Pistachio one was done on a "dirty" Gelli plate that had a bit of colour and pattern on it already. This makes for a more interesting print. I then added the Sprig layer in Phthalo Turquoise and the Magpie layer in black. I added some Slow Drying Gel to the black layer to keep the paint wet and get as dark a colour as I could.

To finish it off I stamped the sentiment in black Archival. 

I guess I'd better get up to my craft room.

Stamps and Stencils Used

Lynne
x


Sunday, 26 January 2014

Another Filigraphy Seahorses Gelli Print

This is the last of my samples from January's shows. Hopefully by the end of today I will have finished next month's. As always, there are some fab new stamps coming up and I look forward to sharing what I've made with you.


This is the second of the Gelli print cards that I made with the Filigraphy Seahorses stamps. It's done in a similar way to the first one except this time I used the Seahorse Masks when I took the print so that I had a nice white area to stamp them on. I kept the bodies monochrome but added some colour to their heads.

The seaweed is coloured in with Distress Markers and Glossy Accents have been applied to the bubbles to add some texture.

I best get up to my craft room. The card I've saved until last is one that could take a while. Wish me luck!

Stamps and Stencils Used
Neptune from the Remountable Patterns Set

Lynne
x

Friday, 24 January 2014

Love Is In The Air

Welcome to my 250th post.


This card was a bit of an experiment - it was the first time I tried ink on the Gelli Plate. The colour I chose was Adirondack Wild Plum (sorry Theresa but it's very pink!).

For the base layer I brayered the ink onto the Gelli Plate, then used the Dotty Wave and Ocean Swirl stencils to create the pattern.

The next layer was the locks and keys. I stamped them directly onto the Gelli Plate then took another print on top of the first.

The rest is then stamped directly onto the print. The black birds and Kissing Couple are stamped in Archival ink, the pink birds are Adirondack Wild Plum and the Love Frame is heat embossed in black.

It was fun to do and I shall definitely be experimenting some more with this technique.

Stamps and Stencils Used

Lynne
x

Sunday, 19 January 2014

You Hold The Key To My Heart

Following on from my last post, I have to say that the fish pie was indeed yummy. I guess we really do eat with our eyes though as it just seemed so wrong. Anyway, I won't make that mistake again.

My cards for next month's shows are coming on well; I've now made five. So far they've all been stamped but today the Gelli plate is coming out to play.


Last month's card were mainly Gelli ones and this is another of them. It's a one layer card so that meant lots of masking whilst I created the print.

I started off by planning where I wanted everything to go, then I stuck the Post-it masks of the Letter Boxes onto the card I was using. I applied a layer of Buff Titanium paint onto the Gelli plate and took the first print. This kept the area behind the Letter Boxes white.


I wanted the area behind the heart to be Buff Titanium though, so I applied the Post-it mask for that after I'd taken the first print. That is the stage you can see in the photo above (the print is square - the paper wasn't flat when I photographed it).

After that I applied a couple of shades of brown and using the Ocean Swirl stencil created the top print. I chose that stencil as I thought the swirls went well with those on the padlock.

Then it was just a case of adding the stamping. The padlock was heat embossed in gold, the key heat embossed in black and the letters and boxes were stamped in black Archival. I coloured the swirls of the padlock in and went around the edge of it with a black pen to make it stand out more.

Three heart gems finish it off.

Stamps and Stencils Used

Lynne
x

Wednesday, 15 January 2014

Garden Heart Card

The card in my previous post used the Seaweed Stencil as it was intended - as seaweed. However it also reminded me of roots..........


.........so I thought it would be perfect with these stamps too.

I started off the Gelli print with a base layer of Buff Titanium, then used the Seaweed Stencil and brown paint to create the "root" layer.


The stamping is all done with Versamark Ink which is heat embossed with Black Detail Powder. I added some Distress Ink around the heart to make it stand out and coloured it in with Distress Markers. It is such a beautiful stamp and my favourite from this month.

Stamps and Stencils Used

Lynne
x


Related Posts Plugin for WordPress, Blogger...