Sunday 27 January 2013

Dinosaur Birthday Card

I wasn't sure what to make for my Nephew's 9th Birthday card, but I was given some great ideas from my crafty friends. One of them gave me this link. As soon as I saw it I knew I had to give it a go. I combined it with a couple of their other ideas and this is what I came up with.

The front was cut with my Cameo but the rest is done with scissors.


I kept the front quite simple as the fun part is inside.....


a T-Rex bobblehead.


You print the design onto card (I used American Crafts 12x12 as it's not too thick) and then cut the pieces out with scissors. It's well designed so that the pieces aren't too fiddly.


Once you've cut them all out it's just a case of fitting them all together. No glue is used.

As the name suggests his head bobbles around and it kept me entertained for ages!

It's nearly time for another Clarity show, only one more week to wait. I've just boxed up February's samples ready to go in the post tomorrow. I'm especially pleased with two of them and can't wait to share them with you. Hubby says they're very "Lynne".  lol 

Lynne
x


Friday 25 January 2013

XL Postage Stamp Cards

I do love the Clarity Postage Stamp stamps, so I was excited to see a new one in the collection. Being an XL version there's lots of room to play with.


I decided to do a simple one layer card and used a mask to create the white border of the stamp.


This could be done by hand with a pair of scissors and a craft knife, but it's a fiddly job so I used my trusty Cameo. I scanned an image of the stamp into the Design Studio and was then able to create my own mask.


With that in place I was able to create my scene using my brayer and Ink Dusters. 

This set has the postmark and Queen's head to go with it. I embossed Her Majesty's head with gold embossing powder to give it an authentic look (the embossing shows up better in the first photo).

Not long after I'd made this card I had a birthday card to make, so I decided to do a birthday version. I think the first card looks more washed out in the photo than it did in real life, but I do prefer the second version.  


I went more vibrant with the colours and I think it looks better, especially in the photo.  

I used my Cameo's Design Studio to create a birthday version of the postmark and set it to print, rather than cut. I was then able to build the scene around it. Hopefully Clarity will bring out some more postmarks themselves, a Christmas and a Birthday one would be fab.

I noticed the other day that when the cards are put on the Clarity website they list the stamps that are used to make them. I thought it might be useful to add the link to that page here. That way if you want details of any of the stamps you will know where to find them.

Lynne
x

Wednesday 23 January 2013

Home Sweet Home Card


For this card I put the emphasis on the quirky side of the Clarity Quirky Cottage stamps.

As always, I started off the design by playing around with a black ink pad and some copy paper. Once I was happy with it I cut an octagon in the middle of a piece of 12x12 card using my Cameo. Each side measured slightly more than the width of the largest cottage.  This became a template to stamp the words in and ink the grass through. I masked off the word SWEET, then brayered and used my Ink Dusters to fill in the green for the grass.

When that was done I stamped the cottages and coloured them in with my ProMarkers. I chose a variety of colours to carry on the quirky theme. For this reason I did the clouds a bit darker than I normally would. They never seem to photograph that well though.

To finish it off I used a fine black pen to complete the octagon between the houses. I coloured some Card Candi to match the door of the opposite house (I'm hopeless at random!) and used my 1/16" Perfect Layers ruler to give me a thin black border.

Lynne
x


Monday 21 January 2013

Clarity Quirky Cottage Scene

Sorry it's been a while since my last post again but I'm still having computer issues. We're getting to know the Sheffield Apple store quite well!

I thought I'd come back with my favourite of my cards from January's shows.


As soon as I saw the Quirky Cottages in the box I knew they were going to be fun to play with and I wasn't wrong. I so enjoyed making this one.

I started off with the gate and the house on the hill, then I just added to it, using lots of different Clarity stamps.

When I'd finished it still looked like it was lacking something. Hubby and I both had the same idea - cobbles. I'm hopeless at drawing and didn't want to mess it up, so he bravely volunteered to do the paving. Luckily his drawing is better than his DIY!

It's all finished off with a chocolate Labrador in the garden. I would say that it's Maya, but it doesn't seem to be causing any trouble!  :-)

Lynne
x

Wednesday 16 January 2013

Red and Green Roseart Vase Card

This is the first card I made with these stamps.


It kept me and Mum entertained for most of Boxing Day! It was one of those cards where the initial idea came quickly but we just couldn't get it to look right. We got there in the end though (I hope) and had a lot of fun in the process.

The Girly Swirly Splodge Away mask is a great match for the swirls on the stamp. I ran it through my Grand Calibur to create the embossed effect on the green card.  The white card is all Centura Pearl Snow White.

I stamped the vase onto acetate using Stazon then stuck it to a sheet of double sided adhesive and adhered the gilding flakes. After cutting it out I was left with a beautiful gilded vase. The top layer of acetate gives it a glazed look which I really like.

The flowers are stamped in Rocket Red Brilliance, with Olympia Green Versafine for the stems. The tag was done the same way, except I used the second generation ink to make it paler and the text stand out.

The scalloped mat, paper ribbon, and lace were cut on my Cameo.

The main image is mounted onto 3D foam to give it a bit of dimension.

Lynne
x

Sunday 13 January 2013

Roseart Vase Card with a Shaving Foam Background

Firstly apologies for not posting sooner. On Monday I was typing away when all of a sudden my screen went black! My poor iMac is now in hospital being fixed. Hubby has kindly lent me his laptop so I can finish this post. Thank goodness for auto save!

I thought I'd better blog this card first, as I've had a few people ask me questions about the shaving foam technique I used to create the background. It comes from Dawn Bibby's Stamps, Stickers and Stencils DVD.

The finished card. Made using the Clarity Roseart set of stamps. The verse on the little tag was stamped on shrink plastic.


A close-up of the vase. This is also made with the same marbled paper as the background. The Roseart stamp is stamped in Versamark and heat embossed with Metallic Gold Sparkle Wow! powder.  

I was a lucky girl at Christmas as Mum and Dad bought me some new Spellbinders dies. This is from the Floral Ovals set and was cut out of Centura Pearl card. 

As they are so intricate the first time I used them I had a nightmare trying to get the card out of the die. It also took a few passes through my Calibur to cut it fully. I've since bought some Cut Rite Wax Paper from Joanna Sheen and it is brilliant. The die cuts first time and the card comes away from the die really easily. It's also a lot easier to remove the little pieces that are left behind. I'd previously tried baking parchment from the supermarket. It was better than nothing, but nowhere near as good as the waxed paper.


A close-up of the paper. You can't really see the shimmer from the sprays in the photo. In real life it looks so pretty.

Now here's how it came about -

I'd already made one card using these stamps (the green and red one) and was trying to think of ideas for another one. Mum said "What about a pretty background using Dawn Bibby's shaving foam technique?". We went out and bought some shaving foam and started playing.

Stupidly I didn't think to take any photos until we'd done most of it, but it's fairly simple.

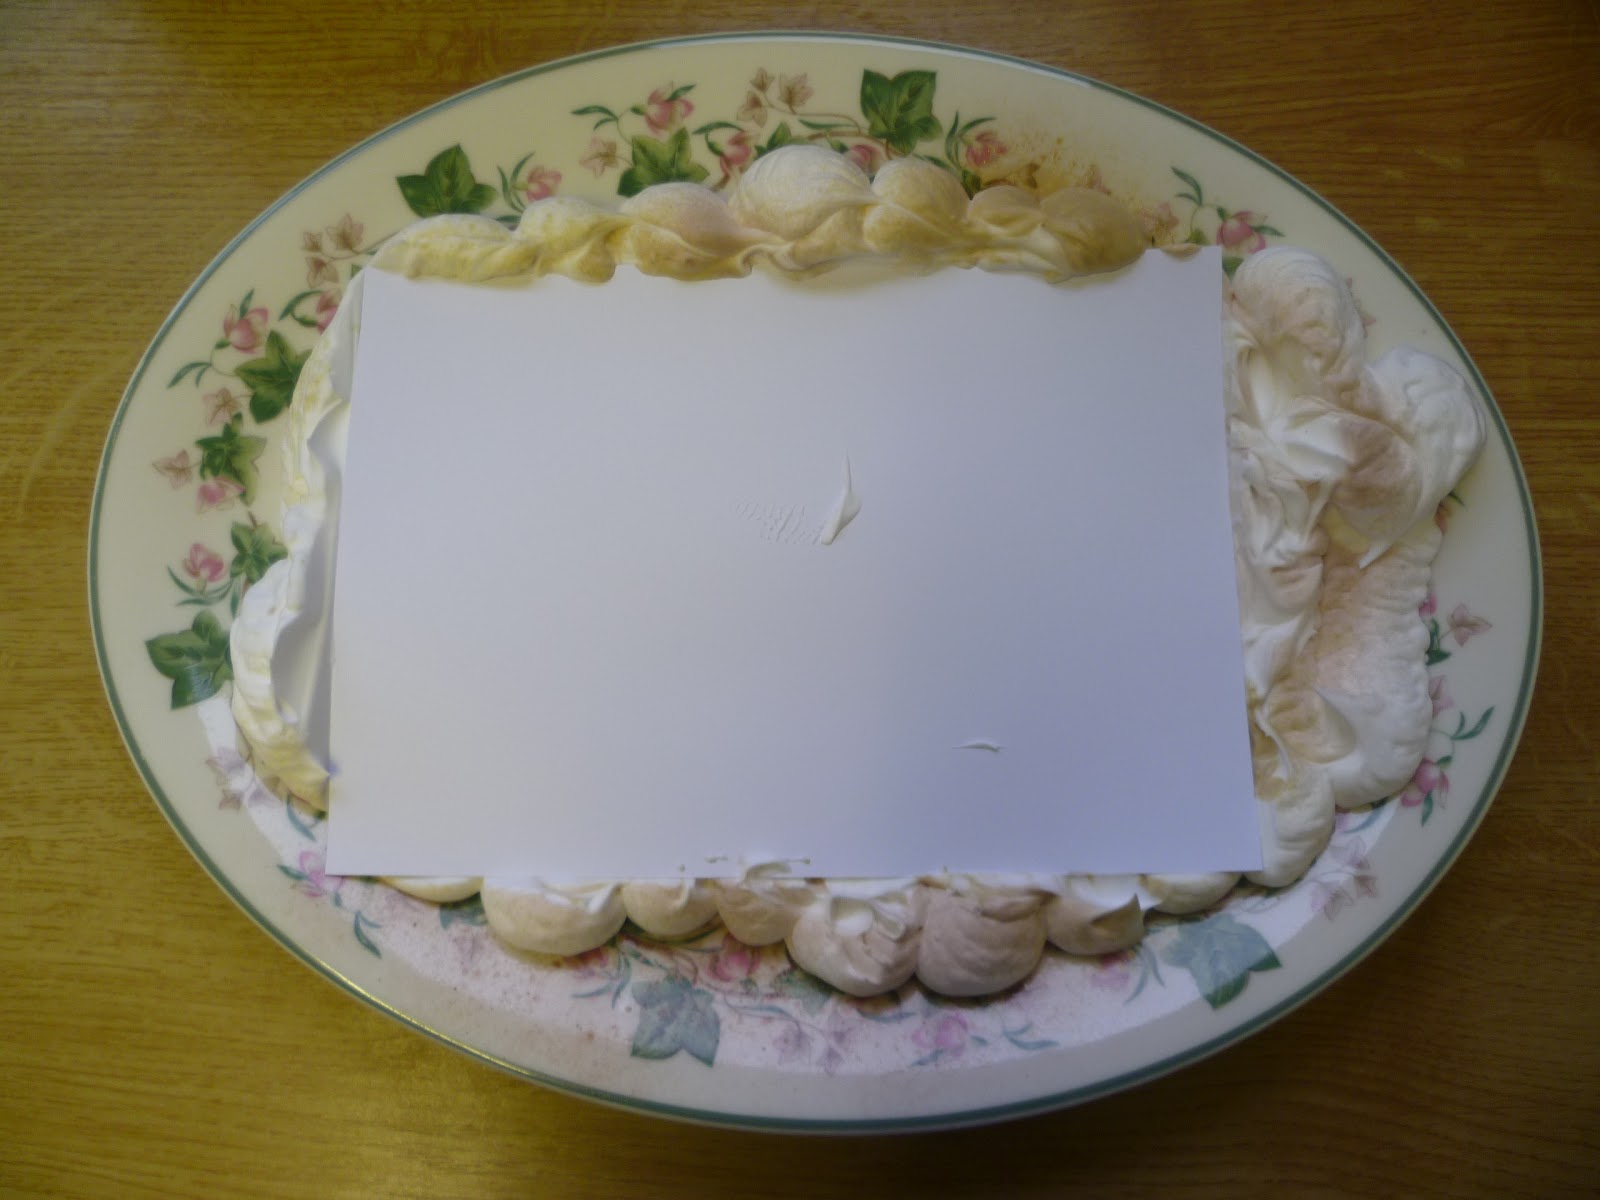
1)  Spray a nice thick layer of shaving foam onto a plate.

2) Spritz with mica sprays. We used Dawn Bibby's Shimmer Spritz in Rosie Ritz and Golden Glitz that came with the DVD when it was a TSV on QVC. The green paper that is in a later photo was made with the addition of some green Glimmer Mist.

3) Create a marbled effect in the inky foam by swirling it around with a pokey tool (or something similar).


4) Put the card (we used Theuva) onto the foam and press down. You may need to do this a few times to cover all of the card. It really depends on the look you want to achieve.


5) Remove the card and wipe away the foam. This can be done straight away. As we were in the kitchen I grabbed a non-stick fish slice to remove the foam. It worked really well but don't tell Hubby! 

Apologies for all the crap in the background of this photo. I was going to clear the sink before we got started but Mum was so keen to play that she'd already started before I'd had the chance! We did it the day after Boxing Day and if you look closely you might see my homemade sausage rolls in the Lock n Lock!!! 


When it has dried you are left with beautiful backing papers.

Lynne
x

Sunday 6 January 2013

January's Clarity Samples

It's my favourite time of the month again, Barbara Gray is on Create & Craft. I love seeing all the clever ideas the rest of the Design Team have come up with (and wishing I had thought of them :-).


Here's the group shot of the cards I made - I hope you like them. I had a lot of fun making them, especially the one with the shaving foam background! I got the technique from Dawn Bibby's Stamps, Stickers, and Stencils DVD.  

I will blog them all separately, with details of how I made them, over the next week or so.

Happy stamping.

Lynne
x

Wednesday 2 January 2013

Snow Globe Cards

Happy New Year!

I can't believe that I've been writing my blog for nearly 6 months now! I would like to thank everyone who has visited, left comments, or chosen to follow me. I hope you enjoy what I do, I'm looking forward to seeing what new stamps Clarity have in store for us in 2013.

As I've said before, I love snow globes. I have an old snow globe stamp and one year I made all of my Christmas cards with different snowy scenes in them. They were the first cards that I received a lot of lovely comments on. Some of my followers who have known me for a long time will probably remember them.


This is one of the cards I made for HSE 24. This time I used my Cameo to cut out the snow globe shape and the scene was created with the Clarity Village stamps and Church. I have to give Mum some credit for the colour. I'd planned the scene out on copy paper and was just deciding what colour to stamp it in when I recieved an email from Dad. It was a photo of one of Mum's Christmas cards, a snowy scene, and I loved the colour of it. I was straight on the phone to ask what she'd used! It's Weathered Wood Distress Ink and I think it gives a lovely frosty/misty look to the scene. Thanks Mum. 

I added some Glamour Dust for a bit of sparkle and the trimming along the base is from a Martha Stewart punch. It doesn't really show up in the photo but there is acetate on the front of the globe to make it look more realistic.

Here's a few of those original cards. I think they are probably from about six years ago. As you can see quite a few of my snowman stamps made an appearance. I even put a photo of my dog in one. That's my favourite, of course.


Here's to another year of crafting. I hope it's a great one for us all.

Lynne
x


Related Posts Plugin for WordPress, Blogger...